Special authorities are a method IBM has provided to give users additional capabilities. Everyone immediately thinks of *ALLOBJ special authority, which provides users with the ability to access all objects on the system with all authority. But seven other special authorities exist, each providing the user with additional capabilities.
The table below shows the capabilities provided with each special authority.
| Special Authority | Description |
| *ALLOBJ | Access to every object on the system with ALL authority |
| *AUDIT | Ability to start, stop or modify auditing at the system, user or object level. Can also use SECTOOLS without being granted *ALLOBJ |
| *IOSYSCFG | Ability to manage TCP/IP configuration as well as create file shares |
| *JOBCTL | Ability to manage any job on the system, including holding and canceling |
| *SAVSYS | Ability to save and/or restore any object on the system – or the ENTIRE system – regardless of authority to the objects (meant to enable system operators to perform system saves without having to grant them *ALLOBJ) |
| *SECADM | Ability to create user profiles or change them with sufficient authority as well as modify most Function Usage settings |
| *SERVICE | Ability to use service tools as well as debug *PGM objects |
| *SPLCTL | Ability to access every spooled file on the system, regardless of the user’s authority to the outq |
Users should only be given a special authority if their job requires it. Often, the practice of copying an existing user’s profile to create a new one propagates unnecessary special authority assignments. To avoid this, we recommend that you create ‘template’ profiles – one for each role on the system – that is created with only the special authorities required for the role.
Neither *ALLOBJ nor the additional special authorities should be ignored if you want a sound security practice, so you’ll want to review special assignments regularly. We recommend at least once a month. To facilitate this review, you can use the SQL below which comes from ACS’ (Access Client Solutions) Insert from Examples feature available after launching Run SQL Scripts (Edit->Examples->Insert from Examples).
It’s important to note that special authorities assigned to a group profile are propagated to all group members; therefore, to review special authority assignments, you need to look at the special authorities assigned to the individual profile as well as the group profiles. The following SQL looks for both. To review other special authorities, simply replace both instances of *ALLOBJ with another special authority.
select user_name, special_authorities, group_profile_name, supplemental_group_list, text_description

  from QSYS2.USER_INFO

  where SPECIAL_AUTHORITIES like '%*ALLOBJ%' or

        AUTHORIZATION_NAME in (select USER_PROFILE_NAME

            from QSYS2.GROUP_PROFILE_ENTRIES

            where GROUP_PROFILE_NAME in (select AUTHORIZATION_NAME

                  from QSYS2.USER_INFO

                  where SPECIAL_AUTHORITIES like '%*ALLOBJ%'))

  order by AUTHORIZATION_NAME;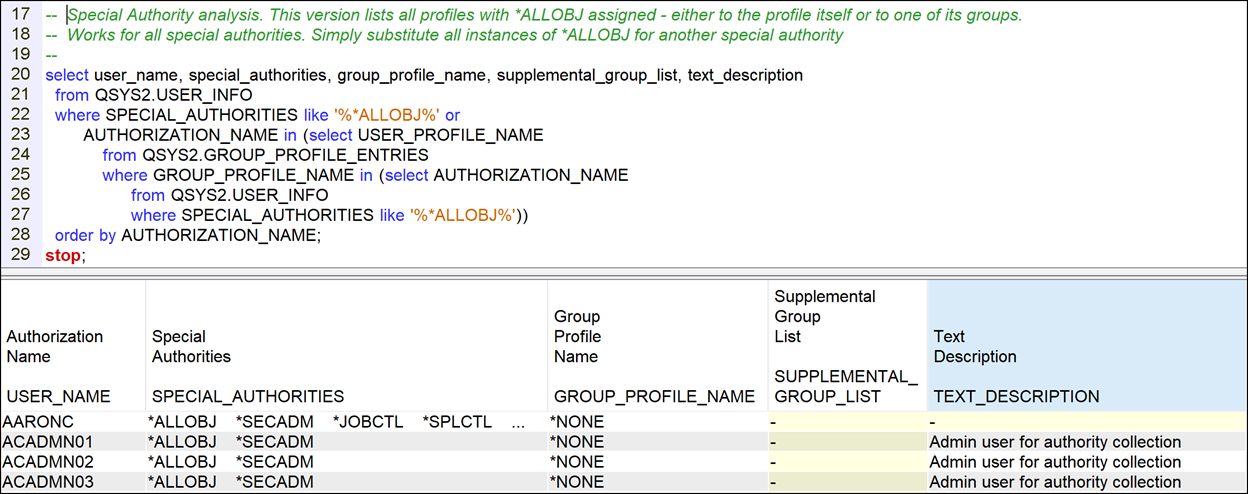
The Special Authority Data Mart
Another way to view and understand how special authorities have been assigned is to use the Special_Authority_Data_Mart. This IBM i feature was added in IBM i 7.5 TR4 and IBM i 7.4 TR10. You can see and work with it via Access Client Solutions (ACS) by opening the Schemas function, then host_name > Schemas > SYSTOOLS > Tables. If you right-click on the name, you can Refresh the data (repopulate it) or View the data. But I prefer to work with this via the Run SQL Scripts feature of ACS. After launching, run the following SQL to populate (or repopulate) the table. Note: This information is a point in time, unlike the qsys2.user_info view, which is always up-to-date.
refresh table SYSTOOLS.special_authority_data_mart;Now that’s populated, you can list the contents as shown in Figure 3. Note that the output is ordered by special authority, then authority source. In other words, all of the profiles assigned *ALLOBJ special authority where the source is their profile are listed first, then the profiles assigned *AUDIT, etc. After that are all profiles whose special authority originates from one of their groups (either their first group or one or more of their supplemental groups).
select * from systools.special_authority_data_mart;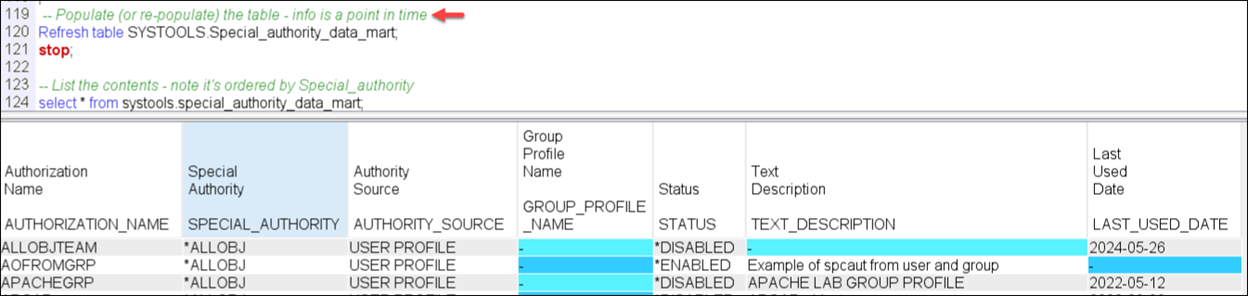
To be honest, I find the view shown in Figure 4 more helpful. I prefer to list the profile and the source(s) of each of their special authorities rather than having the view ordered by the special authority. Obviously you’ll want to play around with this information to find the view that works best for you.
SELECT *

    FROM systools.special_authority_data_mart

    ORDER BY authorization_name, special_authority;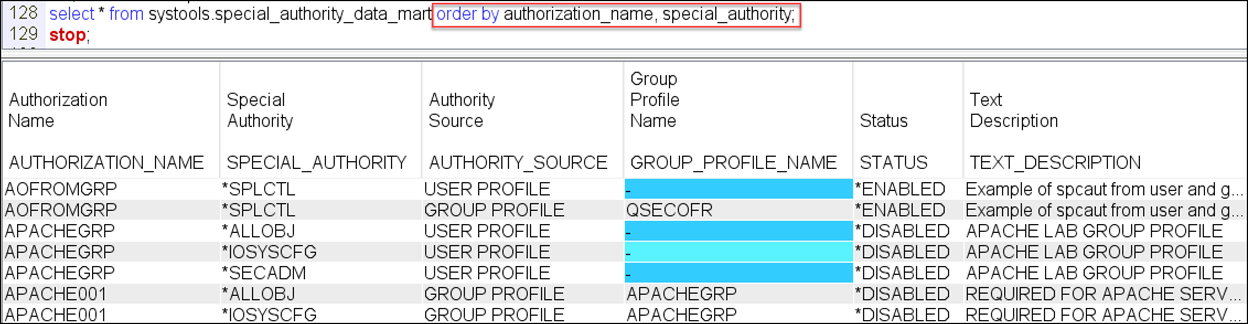
When might you use the first example vs the special authority data mart? For discovering the initial list of profiles with a specific special authority and/or for regular reporting, you’ll want to use the example as shown in Figure 1 because it’s always up-to-date (not a point in time like the data mart.) But, for a deeper investigation, the special authority data mart will likely be your choice.
Contributed by:
Carol Woodbury
IBM i Security SME
Kisco Systems
RELATED POSTS
BROWSE KISCO U
PRODUCT CONTENT